- New
![Extruder TH Board V9 for X1 [SPP042, FAE004]](https://dev.marvle3d.co.nz/17356-large_default/extruder-th-board-v9-for-x1-spp042-fae004-.jpg "Extruder TH Board V9 for X1 [SPP042, FAE004]")
![Extruder TH Board V9 for X1 [SPP042, FAE004]](https://dev.marvle3d.co.nz/17356-medium_default/extruder-th-board-v9-for-x1-spp042-fae004-.jpg "Extruder TH Board V9 for X1 [SPP042, FAE004]")

228 Bush Road, Rosedale | Mon–Sat 9:30–4:30

Auckland Local Stock
Authorized NZ Distributor – Marvle3D
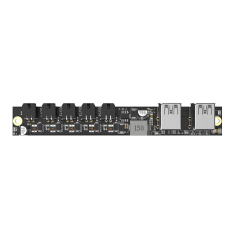
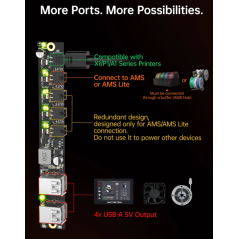
*Extruder TH Board V9 for X1 [SPP042, FAE004]
-Genuine extruder toolhead control board
-Version V9 hardware revision
-Manages extruder and toolhead functions
-Designed for reliable electrical performance
-Direct replacement spare part
Compatible Printers: Bambu Lab X1 Series
Why Marvle3D?
Marvle3D—New Zealand’s expert since 2016, offering friendly support, in-store demos, and one of the country’s largest ranges.
 Security policy(edit with the Customer Reassurance module)
 Delivery policy(edit with the Customer Reassurance module)
 Return policy(edit with the Customer Reassurance module)
What is the TH Board Set V9?
The new version TH Board Set V9 of the X1 and X1C (not for X1E) includes the extruder board, Extruder Interface Board V9 - X1 Series, and TH Board FPC Cable V9 - X1 Series. They can be replaced according to the damaged parts.
If you find that your toolhead circuit board differs from the one shown in this guide, it may be because you are using the old version of the TH Board(V8). If the old version of the TH Board fails, you can replace it with the V9 version set.
Differences between the versions
The main differences between the new and old versions of the t TH Board Set V9. As shown in the pictures below, V8 is the old version, and V9 is the new one.
Operation tips and tricks:
If you encounter difficulties while installing the FPC Cable and small screws on the tool head, you can try the following workaround: Place the three parts on a table and install them in that position. After they are properly connected, slide the FPC cable into the Tool Head from right to left.
1. Place the 2 Tool Head boards on the table or workbench in front of you.
2. Ensure that the FPC Cable is oriented correctly, referring to the provided pictures:
The FPC cable features a row of text, and the direction of reading along the text should be towards the small board (the Extruder Interface Board) following the arrow direction.
3. Assemble the cable while keeping the boards on the table. Make sure not to overtighten the screws and ensure that the metallic shields are in place to secure the connector, as shown in the following image:
4. When you're ready, hold the boards in the specified orientation.
5. Next, slide the FPC cable into position on top of the Tool Head, moving from right to left.
6. Once you have completed these steps, you can proceed with steps 8, 9, 10, and 12, and subsequent instructions provided in the wiki.
Step 1 - Remove the front housing assembly
Open the front housing assembly by carefully separating the components. Disconnect the connecting cable and proceed to remove the front housing assembly.
Step 2 - Loosen the cutter lever
Use the H1.5 Allen wrench to loosen the screw of the cutter lever, allowing it to sag naturally. Press down to disconnect the PTFE tube from the extruder.
Step 3 - Remove the tool head housing
Remove the 8 screws fixing the tool head housing with the H1.5 hex key on both sides, and remove the tool head rear cover and middle frame.
Step 4 - Disconnect the USB cable
Disconnect the USB cable from the extruder main board, and then remove the main board along with the bracket from the tool head.
Step 5 - Remove the connecting FPC
Unscrew the screws at both ends of the connecting FPC Cable using the H1.5 hex key, remove the brackets, disconnect the cable, and then remove it from the tool head.
Note: The 4 screws used in this step are smaller in size. Be cautious not to overtighten the screws to avoid breakage, and make sure not to mix them with other screws.
Step 6 - Remove the interface board
Disconnect the 4 cables that are connected to the interface board. Then, using an H1.5 hex key, remove the two screws securing the interface board. Finally, remove the interface board from its position.
Step 7 - Remove the extruder main board
Disconnect the 3 cables that are connected to the extruder main board. Then, using an H1.5 hex key, remove the three screws securing the extruder main board. Turn the extruder main board to the left and disconnect the two laser cables. Finally, remove the extruder main board from its position.
Step 8 - Install the extruder main board
Install the extruder main board onto the tool head and secure it with three screws. Then, connect the camera flexible cable and install the bracket. Finally, use two screws to lock the bracket in place.
Step 9 - Connect the cable (extruder main board)
Connect the 5 cables to the extruder main board, ensuring to align the connectors correct. It is recommended to reinforce the connections with silicone, as done before when disconnecting them. Arrange the three lidar cables as shown in the diagram to prevent damage and interference during enclosure installation.
Step 10 - Install the interface board
Install the interface board onto the tool head and secure it with two screws. Next, connect the cable of the Hall board (extruder). It is recommended to reinforce the connection with silicone glue. Afterward, connect the 3 hotend cables.
Specific References
No customer reviews for the moment.
Auckland Local Stock
Authorized NZ Distributor – Marvle3D
*Extruder TH Board V9 for X1 [SPP042, FAE004]
-Genuine extruder toolhead control board
-Version V9 hardware revision
-Manages extruder and toolhead functions
-Designed for reliable electrical performance
-Direct replacement spare part
Compatible Printers: Bambu Lab X1 Series
Why Marvle3D?
Marvle3D—New Zealand’s expert since 2016, offering friendly support, in-store demos, and one of the country’s largest ranges.
![Bambu Lab Hotend Cooling Fan For X1C 3D Printer [FAF002]](https://dev.marvle3d.co.nz/16748-home_default/bambu-lab-part-filament-buffer-for-p2s.jpg)
![Bambu Lab Hotend Cooling Fan For X1C 3D Printer [FAF002]](https://dev.marvle3d.co.nz/16749-home_default/bambu-lab-part-filament-buffer-for-p2s.jpg)
![Extruder Unit for X1C [FAE017]](https://dev.marvle3d.co.nz/14814-home_default/bambu-lab-x1c-upgrade-extruder-unit.jpg)
![Extruder Unit for X1C [FAE017]](https://dev.marvle3d.co.nz/14813-home_default/bambu-lab-x1c-upgrade-extruder-unit.jpg)