- New
![Live View Camera for H2 [CAM006]](https://dev.marvle3d.co.nz/17357-large_default/live-view-camera-for-h2-cam006-.jpg "Live View Camera for H2 [CAM006]")
![Live View Camera for H2 [CAM006]](https://dev.marvle3d.co.nz/17357-medium_default/live-view-camera-for-h2-cam006-.jpg "Live View Camera for H2 [CAM006]")
![Live View Camera for H2 [CAM006]](https://dev.marvle3d.co.nz/17358-medium_default/live-view-camera-for-h2-cam006-.jpg "Live View Camera for H2 [CAM006]")

228 Bush Road, Rosedale | Mon–Sat 9:30–4:30

Auckland Local Stock
Authorized NZ Distributor – Marvle3D
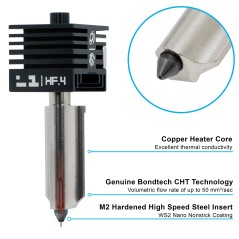
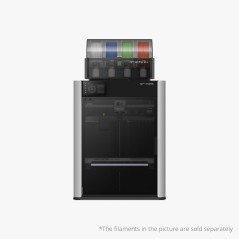
*Live View Camera for H2 [CAM006]
-Enables remote live video monitoring
-Supports spaghetti detection features
-Provides real-time print visibility
-Designed as a dedicated printer camera module
-Genuine replacement camera component
Compatible Printers: Bambu Lab H2 Series
Why Marvle3D?
Marvle3D—New Zealand’s expert since 2016, offering friendly support, in-store demos, and one of the country’s largest ranges.
 Security policy(edit with the Customer Reassurance module)
 Delivery policy(edit with the Customer Reassurance module)
 Return policy(edit with the Customer Reassurance module)
Disassembly Guide
Step 1: Remove the live view camera
Use an H2.0 Allen key to remove the two fixing screws (M3x6).
Grasp the base shell of the live view camera firmly, gently push it upwards, then flip it outward. Remove the live view camera, exposing the camera cable on the back.
Step 2: Disconnect the live view camera cable
Release the socket latch, disconnect the live view camera cable, and remove the live view camera.
Assembly Guide
Step 1: Connect the live camera cable
Replace the live view camera with a new one, reinsert the camera cable into the socket. Ensure that the protrusions on both sides of the cable are fully inserted into the socket before securely fastening the latch. (The blue part is completely covered, indicating that the connection is secure.)
Step 2: Install the live view camera
When installing the live view camera, align the holes of the camera base with the leadscrew and insert it. The leadscrew helps to position the camera accurately.
Verify the Functionality
Connect the power cable and turn on the printer. In Bambu Studio or Bambu Handy, click the Play button to check if the video streams normally.
If the video does not display correctly, verify that the cables are properly connected and try again. If the issue persists, contact Bambu Lab Technical Support for further assistance.
Specific References
No customer reviews for the moment.
Auckland Local Stock
Authorized NZ Distributor – Marvle3D
*Live View Camera for H2 [CAM006]
-Enables remote live video monitoring
-Supports spaghetti detection features
-Provides real-time print visibility
-Designed as a dedicated printer camera module
-Genuine replacement camera component
Compatible Printers: Bambu Lab H2 Series
Why Marvle3D?
Marvle3D—New Zealand’s expert since 2016, offering friendly support, in-store demos, and one of the country’s largest ranges.
![Bambu Lab Extruder Filament Sensor for H2S & H2S Laser Printer [FAC142]](https://dev.marvle3d.co.nz/16342-home_default/bambu-lab-part-extruder-filament-sensor-for-h2s.jpg)
![Bambu Lab Extruder Filament Sensor for H2S & H2S Laser Printer [FAC142]](https://dev.marvle3d.co.nz/16340-home_default/bambu-lab-part-extruder-filament-sensor-for-h2s.jpg)
![Cooling Fan for H2S [FAF020]](https://dev.marvle3d.co.nz/17347-home_default/cooling-fan-for-h2s-faf020-.jpg)
![Cooling Fan for H2S [FAF020]](https://dev.marvle3d.co.nz/17348-home_default/cooling-fan-for-h2s-faf020-.jpg)
![Extruder Gear Assembly for H2S [FAE033]](https://dev.marvle3d.co.nz/17351-home_default/extruder-gear-assembly-h2s-fae033-.jpg)
![Extruder Gear Assembly for H2S [FAE033]](https://dev.marvle3d.co.nz/17350-home_default/extruder-gear-assembly-h2s-fae033-.jpg)
![Heatbed Unit 220V Printer for H2S [FAC150]](https://dev.marvle3d.co.nz/16702-home_default/bambu-lab-part-filament-buffer-for-p2s.jpg)
![Heatbed Unit 220V Printer for H2S [FAC150]](https://dev.marvle3d.co.nz/16703-home_default/bambu-lab-part-filament-buffer-for-p2s.jpg)
![Hotend Heating Assembly for H2S [FAH046]](https://dev.marvle3d.co.nz/16441-home_default/bambu-lab-part-.jpg)
![Hotend Heating Assembly for H2S [FAH046]](https://dev.marvle3d.co.nz/16442-home_default/bambu-lab-part-.jpg)